Managing samples is good. Making them known is better!
But, in computing, exchanging information is sometimes complicated:
- file formats can be multiple
- the names of the fields (or columns) do not correspond with the ones you are manipulating
- some words needs to be translated to be understood. For example, if you identify a trout fario with the code TRU, but your partner is waiting for the scientific name (Salmo trutta), you must be able to perform the conversion
- some exports require to provide several different files, whose content cannot be deduced from the stored information (meta.xml file to GBIF, whose content corresponds to a very precise structure)
To meet this need, the sample export module has been added to version 2.5 of Collec-Science. This module allows you to create a batch of samples, and to export them in fully customizable formats.
Necessary fees
To use this feature, you must have the right Collection. If not, contact the business manager of the application.
Create a batch of samples
From the sample selection window :
- select a collection (the export only works for one collection at a time, it is not possible to indicate samples from different collections in the same export)
- add the additional parameters you would need to filter your samples, and then run the search
- check the samples you want to export
- At the bottom of the table, choose the Create an export batch operation.
Describe an export model
Create translators
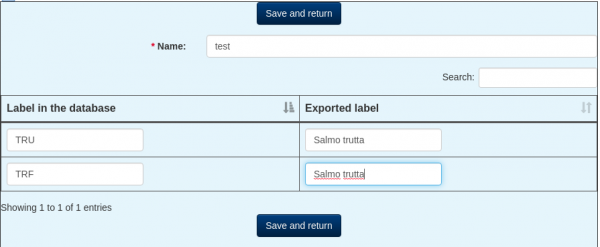
If you need to transcode labels so that they are understood by the target information system, you need to create a translator. To do so :
- Export samples > Translators
- New…
- specify a name, then enter all the labels to be translated and their translation
In this example, labels TRU and TRF will be translated to Salmo trutta.
Create dataset models
The dataset templates correspond to the files that will be produced. They can contain 4 different types of information:
- sample data
- a description of the collection, including information about the person in charge of it
- the documents associated with the samples
- a free format, to create a fixed content file (xml description file, for example).
Two types of information are needed to describe them :
- general data (file format, some specific parameters such as the character separator for CSV files or the XML header)
- the list of columns to be integrated.
Describe the general information
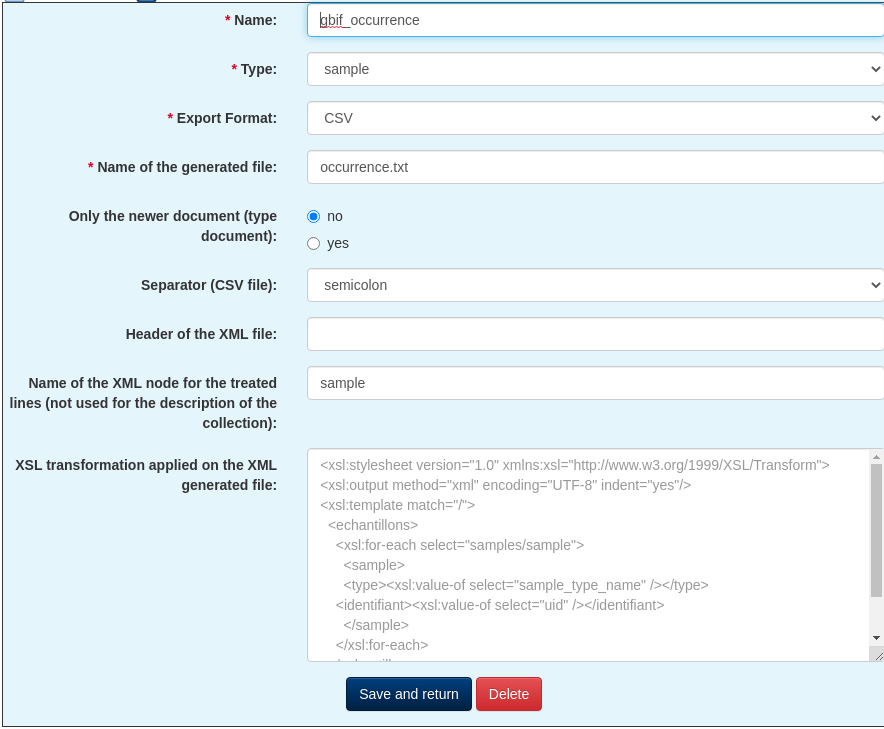
Here is the information to be indicated :
- name : free wording
- type :
- sample: sample description
- collection : description of the collection
- document: general information on the documents associated with the samples, including the download link
- arbitray content: file whose content is fixed and described
- export format:
- CSV : delimited file, with header line
- XML: file in XML format
- JSON : file in JSON format
- name of the generated file: name of the file that will be sent to the browser, or embedded in the zip file
- for the document type, indicate whether you want to provide a list of all documents associated with the samples, or only the last one created
- for the CSV export format, specify the separator to be used (tab, semicolon, comma)
- for the XML export format :
- indicate the header of the XML file (default: <?xml version= “1.0″?><samples></samples>). The occurrences will be stored here in the <samples> tag.
- Specify the node name for each occurrence (default is sample). Thus, for a sample, the information will be stored in <samples><sample>(…)</sample></samples>
- XSL transformation: if the content is filled in, the “raw” XML file will be transformed using the commands described in this field, to generate a file that conforms to what is expected. See below for an example of how to format the data describing a collection.
Describe the columns
| Name of the column | Description | Type of export |
|---|
| identifiers | List of secondary identifiers. You must specify the code that you want export into the second form field | sample |
| metadata | Data presents into the metadata of the sample. You must indicate the name of the field to export into the second form field | sample |
| web_address | URL which will be generated to access to the detail of the sample or to the content of the document | sample, document |
| content_type | Standard description of the link furnish by web_address | sample, document |
| fixed_value | Fixed value. It content is found from the field Default value | sample, document, collection |
| content | ontent of the file, for arbitrary_content type. The content must be specified into the field Default value | arbitrary content |
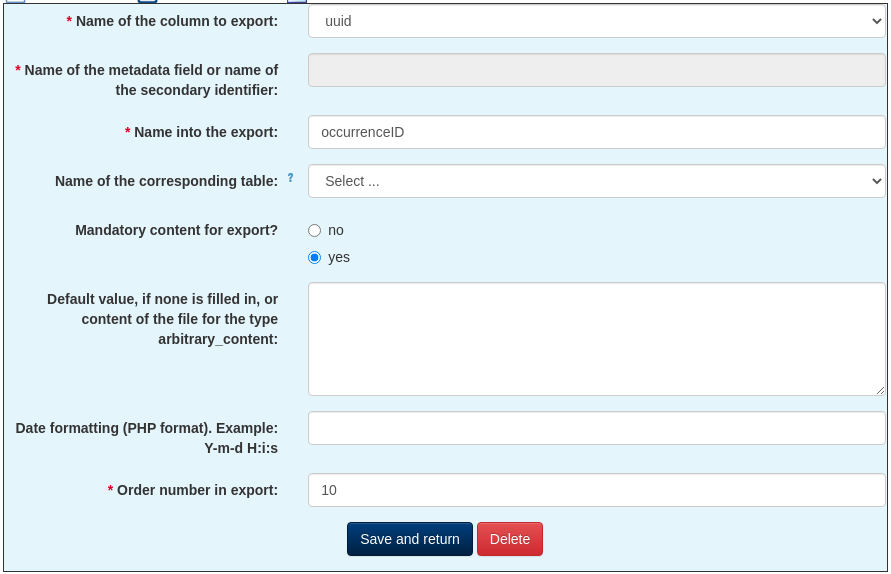
From the details of a template, you can indicate the columns to be inserted in the export file. The list of available columns depends on the type of file (sample, collection, etc.). You will find the information present in the database, with some additional fields:
Here is the meaning of the different fields:
- name of the column to be exported: data to be extracted (see the previous table for the meaning of some additional columns)
- name of the field in the metadata or name of the secondary identifier: see previous table, identifier columns or metadata
- name in the export: column header (or field name) that will be indicated in the generated file
- name of the correspondence table: name of the translator that will be used to transcode the labels (see above). If the label is not found, the initial value will be kept.
- mandatory content for export: if the indicator is set, the export will fail if the field is empty.
- default value: if no value is found, it will be replaced by the content of this field.
- date formatting: for date type fields, it is possible to format the result, using the proposed syntax. For the ISO 8601 format (2004-02-12T15:19:21+00:00), you can use the value c
- order number in the export: the list of columns will be sorted by the ascending value of this attribute.
Create an export template
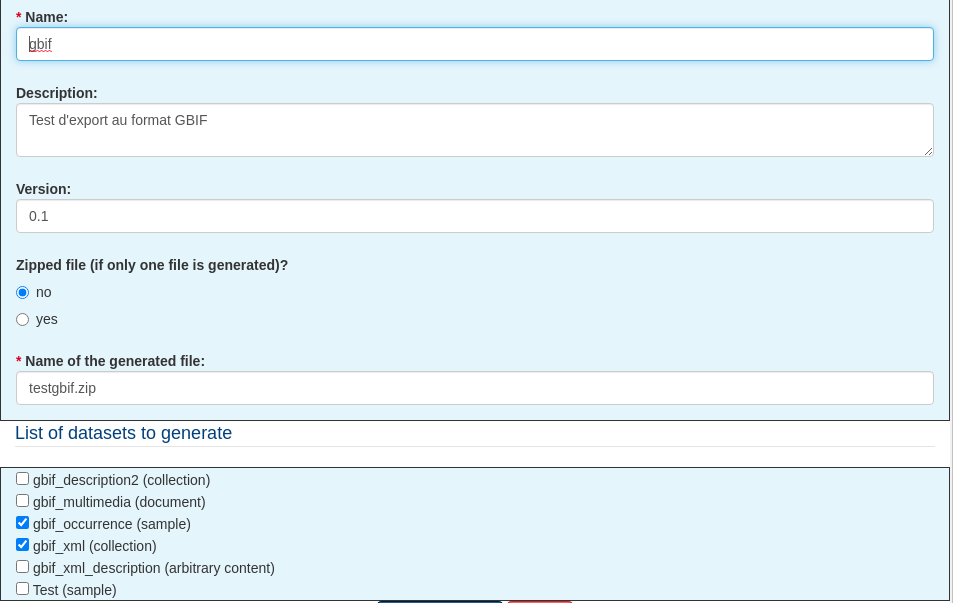
The export templates group one or more data sets. Here is the information to be indicated :
- name: free text
- description: indicating the target and the content of the template is recommended
- version: you can indicate a version number, if necessary
- compressed file: by default, if the export contains several datasets, the generated file will be compressed in zip format. If the export contains only one dataset, you can indicate whether you want the generated file to be in zip format or in the original format.
- name of the generated file: full name with the extension of the file to be created
- list of datasets to generate: indicate the datasets (previously created) that you want to add in your export file.
Export a batch
Once the batch has been created, you can export it. The search is only done by collection.
A batch can be exported according to several models. You must first create an export associated with the batch:
Once the recording is done, you can generate the file from the batch detail, by clicking on the corresponding icon in the list of exports :
Example of data formatting describing a collection with an XSL transformation
The XSL language is used to transform the data in an XML file and produce the result expected by the recipient. Here is an example of a transformation concerning the description of a collection (taken from an attempt to export to GBIF).
The content generated by the application, before transformation, is this one:
<collection>
<referent_name>Quinton</referent_name>
<referent_email>eric.quinton@inrae.fr</referent_email>
<collection_name>nom_collection</collection_name>
<collection_keywords>
<keyword>mot-clé 1</keyword>
<keyword>mot-clé 2</keyword>
</collection_keywords>
<academical_directory>https://orcid.org</academical_directory>
<academical_link>https://orcid.org/0000-0003-4207-4107</academical_link>
<referent_firstname>Éric</referent_firstname>
</collection>
The code used for the transformation (XSL field) contains these commands:
<xsl:stylesheet version="1.0" xmlns:xsl="http://www.w3.org/1999/XSL/Transform">
<xsl:output method="xml" encoding="UTF-8" indent="yes"/>
<xsl:template match="/">
<eml:eml
xmlns:eml="eml://ecoinformatics.org/eml-2.1.1"
xmlns:stmml="http://www.xml-cml.org/schema/stmml-1.1"
xmlns:xsi="http://www.w3.org/2001/XMLSchema-instance"
packageId="doi:10.xxxx/eml.1.1" system="https://doi.org"
xsi:schemaLocation="eml://ecoinformatics.org/eml-2.1.1 eml.xsd">
<xsl:for-each select="collection">
<dataset>
<title><xsl:value-of select="collection_name" /></title>
<creator id="https://orcid.org/0000-0003-4207-4107">
<individualName><xsl:value-of select="referent_firstname" /> <xsl:value-of select="referent_name" />
</individualName>
<electronicMailAddress><xsl:value-of select="referent_email" /></electronicMailAddress>
<xsl:element name="userId">
<xsl:attribute name="directory">
<xsl:value-of select="academical_directory" />
</xsl:attribute>
<xsl:value-of select="academical_link" />
</xsl:element>
</creator>
<keywordSet>
<xsl:for-each select="collection_keywords/keyword">
<keyword><xsl:value-of select="." /></keyword>
</xsl:for-each>
</keywordSet>
<contact>
<references><xsl:value-of select="academical_link" /></references>
</contact>
</dataset>
</xsl:for-each>
</eml:eml>
</xsl:template>
</xsl:stylesheet>
Once the transformation is done, here is the content of the generated file:
<eml:eml xmlns:eml="eml://ecoinformatics.org/eml-2.1.1" xmlns:stmml="http://www.xml-cml.org/schema/stmml-1.1" xmlns:xsi="http://www.w3.org/2001/XMLSchema-instance" packageId="doi:10.xxxx/eml.1.1" system="https://doi.org" xsi:schemaLocation="eml://ecoinformatics.org/eml-2.1.1 eml.xsd">
<dataset>
<title>nom_collection</title>
<creator id="https://orcid.org/0000-0003-4207-4107">
<individualName> Éric Quinton</individualName>
<electronicMailAddress>eric.quinton@inrae.fr</electronicMailAddress>
<userId directory="https://orcid.org">https://orcid.org/0000-0003-4207-4107</userId>
</creator>
<keywordSet>
<keyword>mot-clé 1</keyword>
<keyword>mot-clé 2</keyword>
</keywordSet>
<contact>
<references>https://orcid.org/0000-0003-4207-4107</references>
</contact>
</dataset>
</eml:eml>
Some explanations :
- all the tags that start with xsl: are commands that will be interpreted
- the other labels are written as they are in the file
- xsl:for-each select= “collection” allows to loop through all the records of the collection tree
- xsl:value-of select= “referent_name” allows to select the content of a tag from the original file
- for keywords, the select is on the keywords/keyword tree
- concerning the userId element, an attribute was positioned by programmatically creating the tag, the attribute having been positioned with xsl:attribute and the content with xsl:value-of
Regarding the use of xsl commands, you can consult https://www.w3schools.com/xml/xsl_elementref.asp or https://www.devguru.com/content/technologies/xslt/elements.html, among others.


